Developing Custom Chatbots for Crisp
As the chatbot trend continues, we receive a lot of questions from customers willing to connect very specific automated response systems to Crisp [https://crisp.chat/en/]. For instance, certain users want to connect Recast.AI [https://recast.ai] to Crisp, or even load custom responses from an internal knowledge base that's not hosted on Crisp. Crisp provides a chatbot software [https://crisp.chat/en/chatbot/] as part of the Crisp Unlimited plan. The Crisp Bot builder does the job for most autom

As the chatbot trend continues, we receive a lot of questions from customers willing to connect very specific automated response systems to Crisp. For instance, certain users want to connect Recast.AI to Crisp, or even load custom responses from an internal knowledge base that's not hosted on Crisp.
Crisp provides a chatbot software as part of the Crisp Unlimited plan. The Crisp Bot builder does the job for most automated response scenarios. However, in the specific use cases listed above, you may want to build your custom chatbot backend and connect it to Crisp via Crisp Chatbot APIs.
Please do not confuse the Crisp Bot plugin with the contents of this article. Crisp Bot is an easy chatbot builder that do not require any programming skills. This article explains how to code your own chatbot, for use cases where our chatbot falls short.
What can chatbots do?
In a lot of businesses, customers often ask the same questions again and again, for which responses are quite simple and thus may be automated to save expensive human resources.
Chatbots can be handy in the following use cases:
- Visitors message your support over the weekend and you want to inform them that support is closed over weekends;
- Your website handles bookings for eg. an hair shaver. The booking process can be handled automatically, as booking orders taken over chat can be forwarded to your own booking management system;
- You run an internal knowledge base and want to serve automated responses from this system, for instance documentation article suggestions based on incoming user questions;
- You run a mailing list and need to collect emails and more information on your users via chat forms;
For instance, at Crisp we get a lot of questions about the now-familiar GDPR. Usually, the user asks something about GDPR for which the response can already be found in our article about GDPR. Though, users don't search our helpdesk website and rather ask over chat right away. Answering manually to each query on GDPR can be very tedious for an human operator, so we created a chatbot matching questions containing "gdpr" and serving the articles on GDPR, as well as more information on how users can sign our DPA contract. This single chatbot scenario saves our team a significant amount of time and mental sanity.
How do chatbots work technically?
When start programming a chatbot backend yourself, you may start with simple "if" and "else if" conditional expressions, matching on the input message. Such code pattern can work for a small bot, but once you scale the bot to more scenarios, the code can become a hurdle to maintain.
At Crisp, we built a theory of how one can build chatbots the proper way.
Base data structures for a chatbot
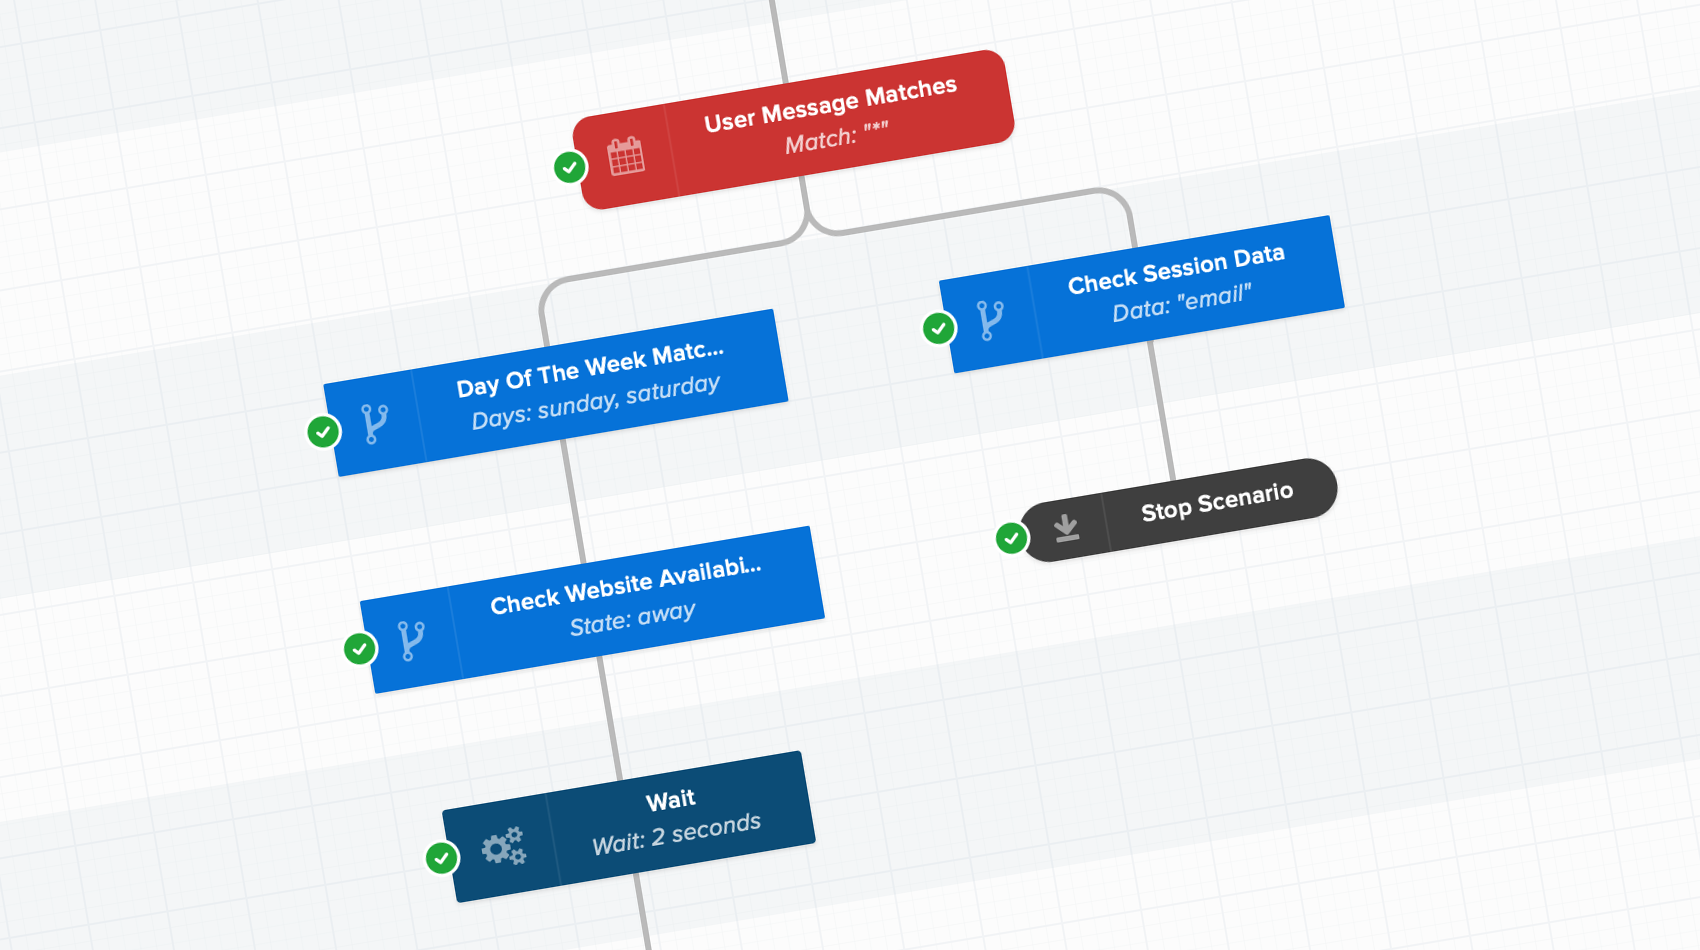
At the essence, a chatbot is nothing more than a graph that maps all expected user behaviors and the actions the chatbot system must take eg. to deliver a response. When you design this graph, you study user behavior, and all possible outcomes. This graph matches on user message patterns. For instance if the user says "GDPR" in a question sentence, the bot goes to next logical action: "Send response on GDPR". But if the user said something similar to "Cancel my account", the bot would go to next action "Are you sure to cancel your account?" where the user would be prompted two buttons ("Yes"/"No"). Following this, we've built a chatbot editor that will allow you to craft scenario the easy way.
As an example, you can find a chatbot logical graph below:

Now that we defined the way we will represent our bot scenario (this is our data model), we need to specify how we want to save the user progress in this state graph. Indeed, as the user talks with our chatbot, we need to save the current state of the chatbot so that the next response is based on all previous user messages. Comparing it to a video game, we "save" the progress of the user in the chatbot scenario graph, and we "resume" the progress once we need to evaluate next scenario options. The analogy to a video game is a good one: the user is following a path in your chatbot scenario, as they would do in the map of Super Mario World after succeeding at each level.
Now that we have the graph of our bot scenario, and we know we need to save the current graph state to resume it later on, we need to think about how we're gonna implement this technically.
Resume the state of your chatbot efficiently
So, you have the bot graph. User progress in the bot is to be saved in a variable or storage system, pointing to the current graph block. How do you find the saved graph block efficiently when you resume the bot session for a given user?
The "simple" way would be to browse all the graph, until you find the target graph block (that has an identifier). This method can be very expensive (and expansive) at scale on very large scenarios, when a lot of concurrent users are asking your systems to resume current scenario.
This is what a regular non-linear graph looks like:

A better way to resume the graph in a proper state would be to vectorize your graph data structure, in a linear data structure. Each block of your graph would reference its linked blocks with the index of the referenced block. As your data structure is a flat vector, you'd be able to store the index of the current block in your storage system, and restore it later on by using the index on the flat list directly, without requiring browsing the whole graph.
This is what a linear graph looks like from #1 to #9 (note that the linearized graph visible above would go from block #1 to block #19):

Scenario graph storage format
The internal storage format of your scenario graph should be in its vectorized (linear) form for performance purposes. Though, we still advise you feed your chatbot a regular non-linear graph, as this makes the graph understandable and modifyable by a human.
Thus, we advise that your chatbot code performs a data structure conversion when it boots up. Your non-linear graph should be linearized when your chatbot starts up. Then, once the chatbot is started up, only the linear data structure is to be used.
How to code your own Crisp auto-response chatbot?
In order to build your own bot and plug it to Crisp, you'll need to connect your code to Crisp systems. Crisp provides a chatbot API, and a RTM API. The REST API provides you with routes to read data from your Crisp account & websites, as well as routes to publish data (eg. send a message in a conversation). The RTM API (aKa Real-TiMe API) is a WebSocket channel that push event data to your apps, for instance when an user sends a message to your website over the Crisp chatbox, you'll receive a RTM event with the message contents. Using the combination of the REST API and RTM API let you build full-fledged apps on Crisp, as well as chatbots.
We won't implement the chatbot logic described above (with scenario graphs and graph-to-linear transforms), as it can be quite verbose and complex for a simple example. Our code example is to be considered as a starting point for you, upon which you can implement your own graph system. What's important here is connecting to Crisp systems to receive messages, and sending response messages.
Note that whatever Crisp apps do use the standard REST API and RTM API. This means that your chatbot has access to the same exact Crisp features as our official Crisp apps. We do not operate any private / sandboxed REST API.
The Crisp REST API is documented at: https://docs.crisp.chat/api/v1/ ; you can refer to this documentation to get a full specification of the data format for all API routes (data you can fetch and data you can send). Some routes our apps use are not documented (as they are not useful to outside users), though you can still safely use them if you need them.
Use a Crisp API library
We built Crisp REST API libraries so that connecting to Crisp is handy for you. Find a library for your programming language:
- node-crisp-api: NodeJS
- php-crisp-api: PHP
- python-crisp-api: Python
- ruby-crisp-api: Ruby
- go-crisp-api: Golang
Obtain a Crisp API token
Before you can connect to the Crisp API, you need to generate an API token. An API token authenticates the user on Crisp systems, and is linked to a Crisp account. To access your Crisp website, this Crisp account must be an operator member of your website.
As a Crisp account can hold a maximum of 20 tokens at the same time, and knowing those tokens are also being generated by Crisp apps to login to your account (eg. Crisp iOS app, Crisp Web app), we advise you create a Crisp operator account dedicated to pure- chatbot API usage. This way you ensure your API token is never expired due to token limit overflow (for instance, you may create a Crisp account on crisp-api@yourdomain.com).
To obtain a Crisp API token, open a terminal (on macOS, open the "Terminal" application). Then, enter the command:
curl -H "Content-Type: application/json" -X POST -d '{"email":"YOUR_ACCOUNT_EMAIL","password":"YOUR_ACCOUNT_PASSWORD"}' https://api.crisp.chat/v1/user/session/login
Replace:
- YOUR_ACCOUNT_EMAIL: Crisp account email
- YOUR_ACCOUNT_PASSWORD: Crisp account password
Then, press the Enter key, and wait for a response to your command. A successful login response will contain a JSON payload, with an identifier and key value, which you should copy and provide to your library calls. This identifier + key pair is your authentication token; you should only keep a single one for all your uses of Crisp APIs via a library we provide.
Example NodeJS code
As a starter, we decided to provide some example NodeJS code. This code will use the node-crisp-api to connect to the Crisp backend, handle connections to the real-time channel and read / store data to the Crisp REST API (eg. send messages).
To start, create a new folder named "crisp-chatbot-test" and create the following files in it:
package.jsonindex.js
Fill package.json with the following contents:
{
  "dependencies": {
    "node-crisp-api": "^1.7.0"
  }
}
Fill index.js with the following contents:
var Crisp = require("node-crisp-api");

// Chatbot configuration
var TOKEN_IDENTIFIER = "YOUR_TOKEN_IDENTIFIER";
var TOKEN_KEY = "YOUR_TOKEN_KEY";
var CHATBOT_URN = "urn:your_domain.com:chatbot:0";
var WEBSITE_ID = "YOUR_WEBSITE_ID";

// Create new Crisp client
var CrispClient = new Crisp();

console.log("starting up");

// Authenticate once to the Crisp API
CrispClient.authenticate(TOKEN_IDENTIFIER, TOKEN_KEY);

CrispClient.userProfile.get()
  .then(function(profile) {
    console.log("authenticated as user", profile);

    // Listen for messages sent from visitors
    CrispClient.on("message:send", function(message) {
      console.log("got message event", message);

      // Filter on your website identifier
      if (message.website_id === WEBSITE_ID) {
        console.log("got user message");

        var response_text = "I did not recognize your message, sorry.";

        switch (message.type) {
          case "text":
            response_text = (
              "Thanks! I received your text message: " + message.content
            );

            break;

          case "file":
            response_text = (
              "Yay! I got your file message: " + message.content.url
            );

            break;
        }

        CrispClient.websiteConversations.sendMessage(
          WEBSITE_ID, message.session_id, {
            type    : "text",
            from    : "operator",
            origin  : CHATBOT_URN,
            content : response_text
          }
        )
          .then(function() {
            console.log("response message sent");
          })
          .catch(function(error) {
            console.error("response message not sent", error);
          });
      }
    });

    console.log("listening for events");
  })
  .catch(function(error) {
    console.error("authentication failed", error);
  });
You're all set. Now, you can install dependencies:
npm install
Once dependencies are installed, you can run the chatbot app:
node index.js
Your chatbot is now running. You can send a test text message from your Crisp chatbot. Once the message gets sent, you'll see a chatbot log in your terminal, and you should get a reply message from the chatbot, in your chatbox.
Your bot should look like this in your Crisp chatbox:
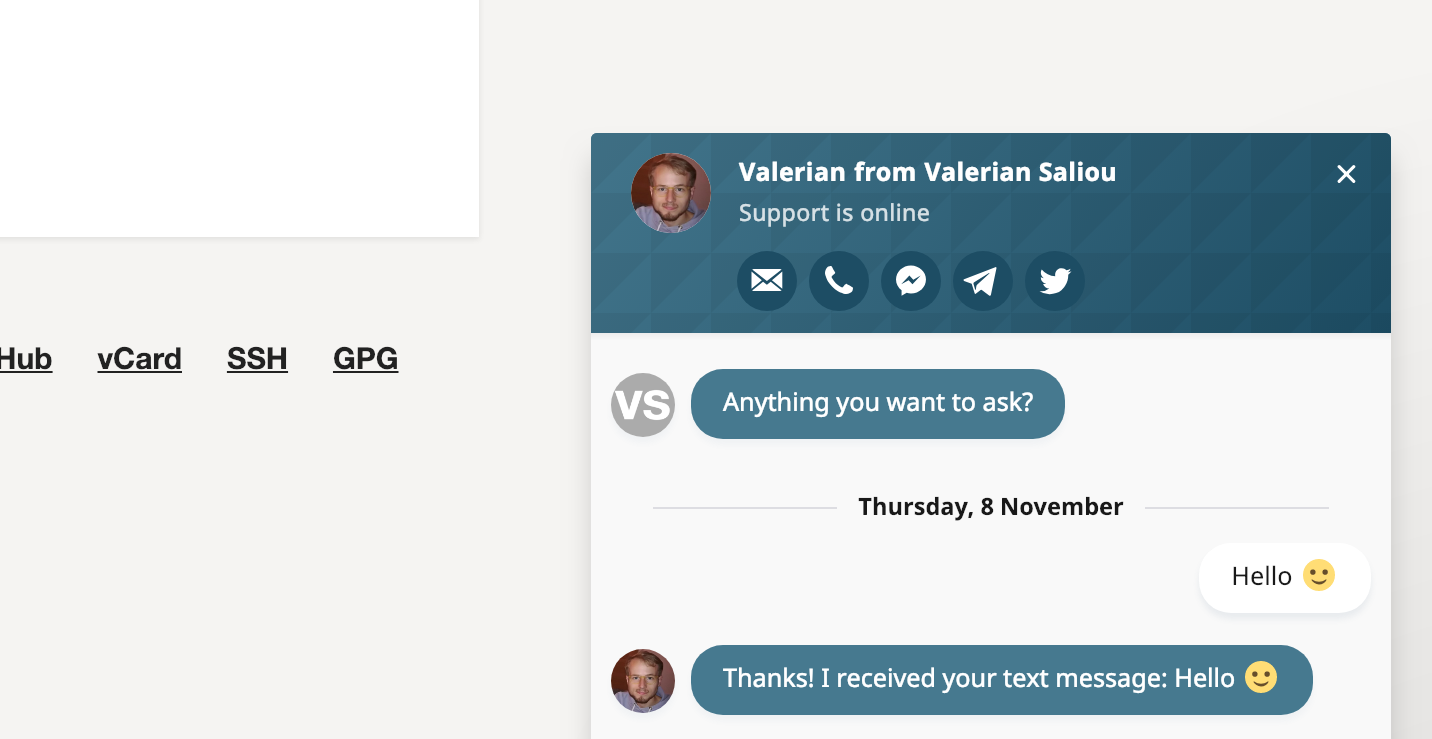
In your terminal, you should see the following logs upon receiving the user message:

Would rather to use our chatbot builder?
You may find out that coding your own chatbot is too complex, or not needed. In this case, we suggest you use our Bot builder, included in the Crisp Unlimited plan.
You can check out some step-by-step articles on how to build your own Crisp bot:

Automated ticket routing: how to get every conversation to the right agent
Manual triage worked when a manager could eyeball every conversation. Now that AI resolves the easy tickets automatically, what's left for your team is the hard, ambiguous residual: exactly the conversations where routing to the wrong agent hurts most.


Unified customer view: how to give every support operator full context before they reply
Most support setups store customer context in pieces: chat here, email there, a note nobody linked. This guide shows what a true unified customer view requires, why fragmented context gets more expensive as you scale.

Ticket escalation done right: how to move issues up the chain without losing context
When AI handles first contact, every handoff to a human should feel like a continuation, not a reset. Here's how to build escalation that carries full context and clear ownership at every step, instead of making customers repeat themselves.